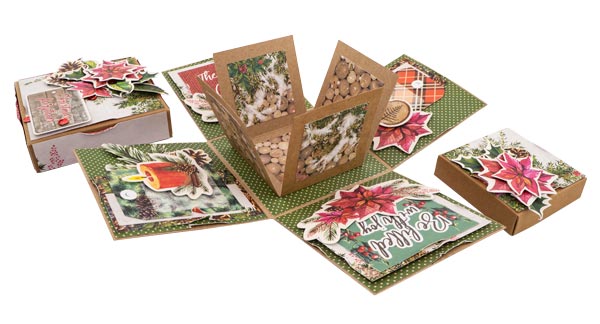
Explosion Gift Box set for the New Year is a wonderful and exciting gift for children and adults. You will make a magic box yourself in which you can place small gifts or sweet surprises. The box will serve as an excellent gift wrap, and later as an interior decoration. The kit comes in a nice box and can serve as a good present for your nearest and dearest ones.
The creative kit contains:
-
Box blank - 1 pc.;
-
Sheets of scrap paper 10x15 cm - 12 pcs.;
-
Set of cards 1 strip;
-
Gold foiled acetate sheet 15x15 cm;
-
Glue "Glossy effect" 20 ml - 1 pc;
-
Cardboard 10x10 cm - 2 pcs.;
-
A set of die-cuts;
-
Set of sequins;
-
Instruction.
How-to-assembly instruction:
• Cut the scrapbooking paper according to the specified diagram attached to the kit.
• Cut a 9.5x9.5 cm square from a gold foiled acetate sheet. Cut out individual elements from the remains of the sheet.
• Decorate the sides of the large and small boxes with scrap paper.
• Glue the blank of the small box to the central part of the large one, as shown in the video (follow the link in a Qr code).
• Glue the lids for the boxes as shown in the video.
• Look carefully at the elements used to embellish the lids, and select them.
• For a small lid: decorate the lid with scrapbooking paper. Adhere to the selected elements using cardboard to create 3D effect in the composition.
• For a large lid:
a) decorate the cover with scrapbooking paper;
b) glue strips of beer cardboard in two layers around the perimeter of the lid;
c) put sequins;
d) glue a 9.5x9.5cm sheet of gold foil to the strips;
e) cut a frame with sides of 1.5 cm from a square of scrapbooking paper 10x10 cm, glue it to the acetate sheet;
f) decorate the lid with selected elements.
• Select items for each of the inside sides of the large box. Make compositions according to the picture or video.
• Scan the QR code and find the video instruction you need. You can also find video instructions for assembling all postcards on the Fabrika Decoru YouTube channel or Instagram.
Stay inspired with Fabrika Decoru!
Made in Ukraine. TM "Fabrika Decoru"
| Item | FDEBK-02 |
| Height | 40 |
| Depth | 40 |
| Width | 220 |
| Length | 330 |
| Weight | 730 |
There is still no one wrote, be the first!
 SPRING & EASTER DECOR, BLANKS AND CRAFT MATERIALS
 FINE FLORA
 KEYSTORY PUZZLES
 ART GLASS
 CREATORS KITS
 SCRAPBOOKING PAPER
 FOIL EMBOSSED MATERIALS
 DECO VELLUM & OVERLAYS
 DECOUPAGE
 ALL FOR PLANNERS
 FAUX LEATHER FOR BINDING
 READY-MADE GIFTS and PRODUCTS
 DIE CUTS AND FRAMES
 EVERYTHING for DIY PHOTO ALBUMS
 CHIPBOARD EMBELLISHMENTS
 STICKERS
 FLAIR BUTTONS
  FURNITURE, DECORATIONS, ACCESSORIES
 ART BOARDS
 DESK ORGANIZERS
 WOODEN AND MDF BLANKS
 DECORATIVE ELEMENTS
 HOME DECORATION
 SMART BOXES
 SHADOW BOXES & DOLL HOUSES
 ARTBOXES
 CARDBOARD WRAPPING & BLANKS
 SHAKERS
 DECOR AND EMBELLISHMENTS
 SEQUINS
 SPRAYS
 DRY PAINTS
 PAINTS FOR CREATIVITY
 LIQUID DOTS and DROPS
 LIQUID LACE
 MATERIALS for CREATIVITY
 PASTES and MEDIUMS
 ADHESIVES
 STENCILS
 SILICONE MATS AND STAMPS
 COLOR CARDSTOCK
 ACCESSORIES
 JARS and BOTTLES for HOBBY
 GIFT CERTIFICATE
 CARDBOARD BOXES
 EMBOSSING POWDERS
 CHRISTMAS GIFTS, BLANKS, DECORATIONS and MATERIALS


